
DOCUMENTACIÓN
Eliminación de ruido con IAÍndice de Documentación
- Introducción
- Instalación de software cliente
- Inicio de RM Noise
- Configura tus dispositivos de entrada y salida
- Establece el nivel de entrada
- El objetivo de RM Noise
- Modos de funcionamiento de ruido RM
- Más sobre la operación en CW
- Descripción de la ventana principal
- Descripción de la ventana de opciones
- Descripción de la ventana de información
- Banderas de línea de comandos
- Ejemplos de línea de comandos
- Resolución de problemas
| Introducción |
|---|
| El proyecto RM Noise utiliza IA con el objetivo de eliminar ruido de las señales de voz SSB o de radio CW. La IA ha sido entrenada utilizando grabaciones de ruido que suelen ser únicas para cada configuración y ubicación. El programa cliente envía la salida ruidosa de la radio a los servidores de IA, y los servidores eliminan el ruido en tiempo real y devuelven el audio al cliente para su escucha. |
| Instalación de software cliente |
|---|
| Requisitos de hardwareUn ordenador con Windows 10 o 11 con acceso a internet y la entrada de audio del ordenador (o algo equivalente) conectado a una radio. Requisitos de softwareen Windows 10 y 11 ya se han probado. Windows 7 ya no es compatible. Instalación de softwareDescarga y ejecuta el programa de configuración: https://ournetplace.com/rm-noise/client-v0-21-9-7/ (Si más adelante quieres eliminar este software, usa Windows añadir/eliminar programas.) |
| Inicio de RM Noise |
|---|
| Se requiere un nombre de usuario y una contraseña, y usaremos indicativos como nombres de usuario. Activa tu cuenta aquí: https://ournetplace.com/rm-noise/registration/ Inicia RM Noise desde el menú de inicio de Windows e inicia sesión con tu nombre de usuario y contraseña. Tras un inicio de sesión exitoso, tus credenciales se guardarán. |
| Configura tus dispositivos de entrada y salida |
|---|
| Tras iniciar sesión, la salida de la radio debería ser audible usando altavoces o auriculares conectados al ordenador. Si no puedes oír tu radio a través del ordenador, configura tu dispositivo de entrada y dispositivo de salida en opciones. Elige activar ajustes después de cualquier cambio de dispositivo. Si aún no puedes oír tu radio o si oyes la radio antes de empezar RM Noise, ve a la sección de resolución de problemas de audio abajo. |
| Establece el nivel de entrada |
|---|
| RM Noise funciona con cualquier nivel de entrada. Sin embargo, con algunas configuraciones es posible que la radio sobrecargue el nivel de entrada del ordenador. Se recomienda que ningún color de fondo de ruido supere -5,5 en la escala. Más información se puede encontrar aquí: https://ournetplace.com/rm-noise/how-to-set-the-input-level/ |
| El objetivo de RM Noise |
|---|
| Si el deslizador está configurado al 100% filtrado, y si el ruido es suficientemente similar a cualquiera del conjunto de entrenamiento, entonces el ruido debería reducirse sustancialmente, pero la señal deseada seguirá siendo audible. Si no hay señal deseada, la salida debería ser silencio. Si los ajustes de la radio son correctos y el deslizador está al 100% pero el ruido sigue filtrándose por el filtro, entonces el ruido puede grabarse para añadirlo al conjunto de entrenamiento. |
| Modos de funcionamiento de ruido RM |
|---|
| Filtrado en directo (Modo por defecto) a) comprueba que los ajustes de tu radio sean consistentes con el estándar actual del proyecto: – Ancho de banda: 2,8 kHz (valores más bajos también pueden funcionar). – Forma del filtro DSP: nítida – Reducción de ruido apagada – Borrado de ruido apagado b) sintonizar la radio a la voz o señal CW deseada c) elegir el filtro AI de voz o CW adecuado de la lista desplegable del filtro de IA d) usar el deslizador original / filtrado, silenciar, bypass y desplazar el tiempo según prefieras Modo de ruido de grabación Ten en cuenta que las grabaciones se envían directamente al servidor. Si tu ruido no se maneja bien con los filtros actuales, la red neuronal de IA puede entrenarse con grabaciones personalizadas de ruido. A lo largo del tiempo puede ser útil hacer múltiples grabaciones de diferentes condiciones, es decir, banda, lluvia, antena, dirección, etc. Este paso no es necesario si RM Noise ya maneja bien tu ruido. Para grabar tu ruido para entrenamiento: a) comprueba que los ajustes de tu radio sean consistentes con el estándar actual del proyecto: – Ancho de banda: 2,8 kHz – Forma del filtro DSP: nítida – Reducción de ruido apagada – Borrado de ruido apagado b) sintonizar la radio a una frecuencia sin cw, voz, wsjt ni ondas senoidales cerca de una frecuencia deseadac) Comienza la grabación navegando por opciones, luego introduce la descripción de la grabación, ajusta los minutos de grabación a 30 y haz clic en iniciar grabación. (Las grabaciones menores a 30 minutos no se consideran para la formación.) Una buena convención de nombres para la descripción sería YourCall-Band-Antenna-num, por ejemplo: k5qe-6M-yagi-1 Mientras grabas, puedes usar el desplegable del filtro AI, el control deslizante original/filtrado, silenciar, bypass y cambiar el tiempo según quieras d) * Nuevo paso *Para la formación, debes revisar y enviar tu grabación: – En la web, navega a CUENTA -> GRABACIONES. Inicia sesión si es necesario. – Elige tu grabación SIN CONTROL (puede tardar hasta 30 minutos en aparecer nuevas grabaciones en esta lista) – Elige AYUDA y revisa las directrices – Confirma que tu grabación cumple con las directrices de NIVEL DE ENTRADA, ANCHO DE BANDA, CORTE INFERIOR, SIN VOZ, CW, WSJT y ser ÚTIL. – Una vez que hayas marcado todas las casillas de las directrices, puedes ENVIAR la grabación para entrenar el siguiente filtro de IA– Si la grabación no cumple con las directrices, puedes ELIMINARLA. – Las grabaciones rechazadas se eliminan tras 90 días. Tras enviar una nueva grabación, esta será inspeccionada y luego incluida en el siguiente conjunto de entrenamiento. El servidor de IA se actualizará tras el entrenamiento. Consulta las grabaciones de CUENTA -> o ESTADO DEL SISTEMA para ver cuándo el nuevo filtro de IA esté disponible. Másinformación sobre cómo registrar el ruido se puede encontrar aquí: https://ournetplace.com/rm-noise/recordings-and-the-top-problems/ https://forum.rmnoise.radio/viewtopic.php?t=30 El proceso de entrenamiento puede durar días, pero no es necesario repetirse a menos que las condiciones de ruido cambien significativamente. En el futuro, esperamos que el sistema generalice mejor a partir de un conjunto de entrenamiento grande y, por tanto, requiera menos grabaciones nuevas. Filtrado de un modo de grabación Las grabaciones realizadas con el cliente RM Noise pueden descargarse y usarse como entrada en lugar del audio en directo de la radio. Si proporcionas tu propio archivo de grabación, el formato del archivo debería ser: – formato .wav de 16 bits – canal único (mono) – muestreado a 8 kHz (Hay una grabación demo disponible para probar. Para probar la grabación demo, descarga el archivo: https://ournetplace.com/rmnoise/rmnoise-demo-1.wav ) a) Para empezar, navega a las opciones -> elige el archivo y selecciona el archivo de grabación demo. El archivo debería empezar a reproducirse. Usa filtro de IA, el deslizador original / filtrado y desplaza el tiempo según prefieras. Mientras reproduces, puedes usar el control deslizante de posición del archivo para hacer cambios grandes en la ubicación de la reproducción, es decir, saltar al centro de la grabación. b) Cuando termines, vuelve a filtrar una señal en vivo navegando a opciones y activa la señal de filtro en el servidor desde DISPOSITIVO DE ENTRADA. |
| More on CW operating |
|---|
| For cw, the radio should still be set with a bandwidth filter of 2.8kHz, but the cw AI filter was trained to only recognize cw sidetones between 500Hz and 1050Hz. This gives an effective filter width of 550Hz using the no bandpass setting in options. Tune your signal’s sidetone within this range, and set the original/filtered slider to 100% to reject signals outside of this range. Under options there are also post-filter cw bandpass settings designed to further tighten the width to 250Hz. To use: – choose the setting that matches your sidetone preference – tune the signal’s sidetone within that range – set the original/filtered slider to 100% to reject signals outside of your chosen range. For example, if you prefer your sidetone at 800Hz: – set your radio’s bandwidth filter to 2.8kHz – choose a cw AI filter on the main window – tune your desired signal to 800Hz – move the original/filtered slider to 100% to reject signals outside of 500Hz-1050Hz using the no bandpass default – optionally choose post-filter cw bandpass 750Hz-1000Hz to reject signals outside of 750Hz-1000Hz. |
Main Window
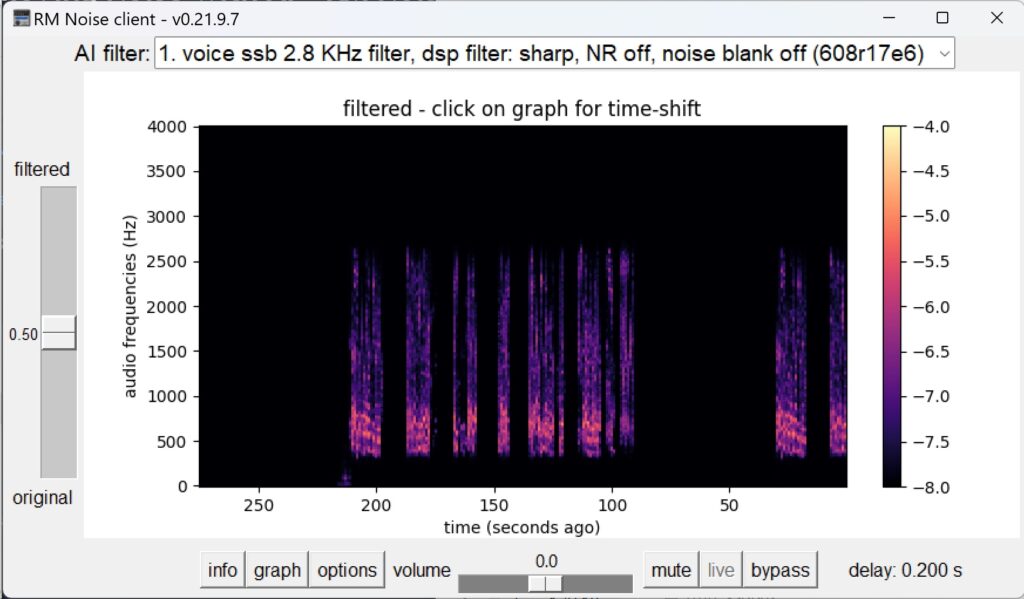
| Description of Main Window |
|---|
| AI Filter The dropdown box lists the available AI filters. Choose the filter that matches your setup. Keyboard keys 1-9 are shortcuts to the AI filters. Original / Filtered Slider This slider controls the output sound blend. The blend is composed of the original noisy signal and the filtered signal, and it can be set anywhere between 0% (original audio, not filtered) and 100% (completely filtered audio). If the desired signal is extremely weak, it may help intelligibility to use filtering less than 100%. Keyboard up/down moves the slider, home jumps to 100% and end jumps to 0% filtered. Time-Shift / Live Button You can listen to recent audio by clicking on the spectrogram graph. The audio will play, starting at the time you clicked. During time-shift, a green rectangle is displayed on the graph and indicates the time where the audio is being replayed. Keyboard left/right adjusts time-shift back/forward in time. You can return to live audio by clicking the Live button or pressing the l key. Note: Time-shift reviews previously filtered audio, and it is not possible to review audio with a different AI filter. Volume / mute / options window Keyboard +/- will raise/lower the volume. Keyboard m will toggle the mute. Keyboard o will open the options window. Bypass This option bypasses the server and sends the signal from the input device to the output device without using the server. Keyboard b will toggle bypass. Graph button The graph button toggles the main graph between displaying the filtered audio and the original audio. The current graphing mode is displayed above the main graph. Info and Options Buttons These buttons open their respective windows. Delay This is the time between receiving the signal from the soundcard and delivering the signal back to the soundcard for playing. The soundcard’s buffering time and the neural net’s lookahead latency are additional components of the absolute time between the signal leaving the radio and playing through the headphones. Drift If you are listening to another radio’s signal, the drift replaces delay. Drift is a measure of how far behind the sound leaving your headphones is from the live audio plus the minimum internet and server latency. Standby If there is no input signal for 5 minutes, the client enters standby mode. In standby mode the client stops sending audio to the server and standby is displayed on the main window. The system also enters standby mode if mute or bypass are activated for 15 minutes. Standby is canceled when a signal is detected and mute and bypass are not activated. |
Options Window
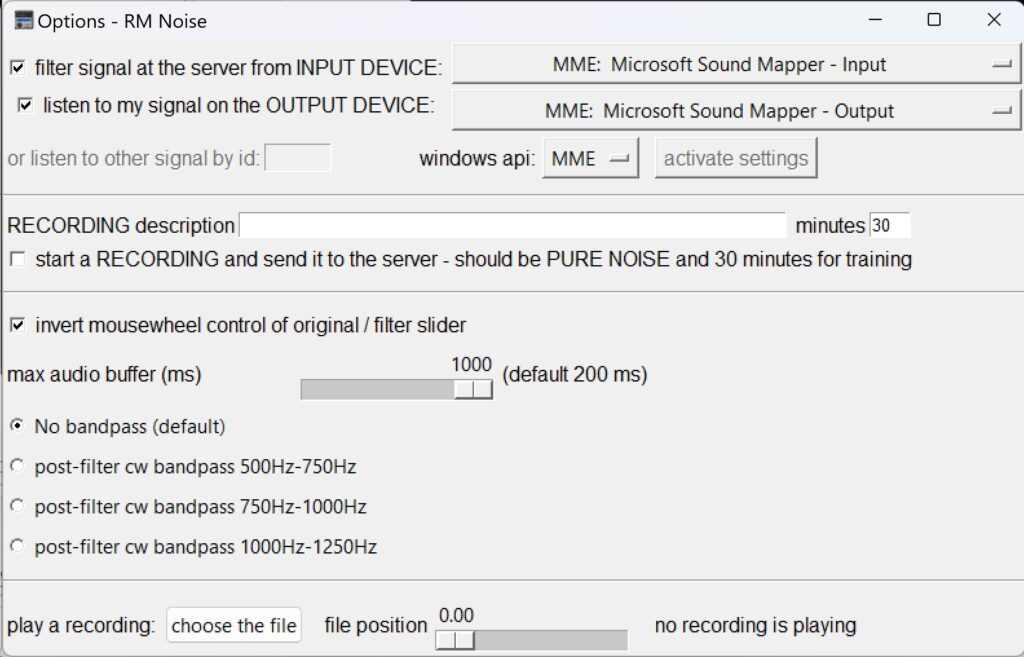
| Description of Options Window |
|---|
| Input device dropdown list The default input device is the Microsoft sound mapper (the input choice is taken from Window’s settings). Use the dropdown to force input to another device. When you are satisfied with your change, choose activate settings. This choice is saved. Output device dropdown list The default output device is the Microsoft sound mapper (the output choice is taken from Window’s settings). Use the dropdown to force output to another device. When you are satisfied with your change, choose activate settings. This choice is saved. Listen to my signal / enter signal id By default you listen to the audio signal from your input device. By unchecking this, you can enter the signal id of another client and listen to another radio. The signal id is a random code that you can manually give to another operator for testing and monitoring purposes. You can use this feature to have a computer connected to the radio and monitor it from 1 or more different computers. Filter signal at the server By default your computer sends the radio’s audio to the AI server. Un-check filter signal at the server to prevent audio from being sent to the server. Invert mousewheel The mousewheel can be used on the main window to adjust both the original/filter slider and the volume. Check invert mousewheel if the behavior of these functions are backwards. Max audio buffer Internet glitches often delay an audio stream. If unchecked, the audio playing can be become unacceptably delayed behind the live signal. This buffer controls the tradeoff between delay and dropping late audio frames. The default max audio buffer is 200 ms. This means the maximum delay allowed is 200 ms beyond the average internet and server latency. – A lower buffer guarantees a shorter delay, but it is possible that more late audio frames will be dropped. – A higher buffer means fewer audio frames will be dropped for being late, but a longer delay is possible. Post-filter CW bandpass options The bandpass settings designed to further tighten the filter width to 250Hz. Note: The 3’rd bandpass filter is effectively 1000-1050Hz because the AI filter ignores tones above 1050Hz. Start a recording / recording description / minutes These options make an unfiltered recording of the radio’s output, and allows clients to provide samples of their noise for evaluation and training purposes. The recordings are sent directly to the server. For more details, see recording noise above. Play a recording / choose the file / file position slider Recordings can be used as input instead of the radio’s live audio. Use the choose file window to choose a wav recording. The .wav recording should be mono and sampled at 8 kHz. When playing a recording, move the file position slider to make large changes to the playback location, i.e. jump to the middle of the recording. |
Info Window
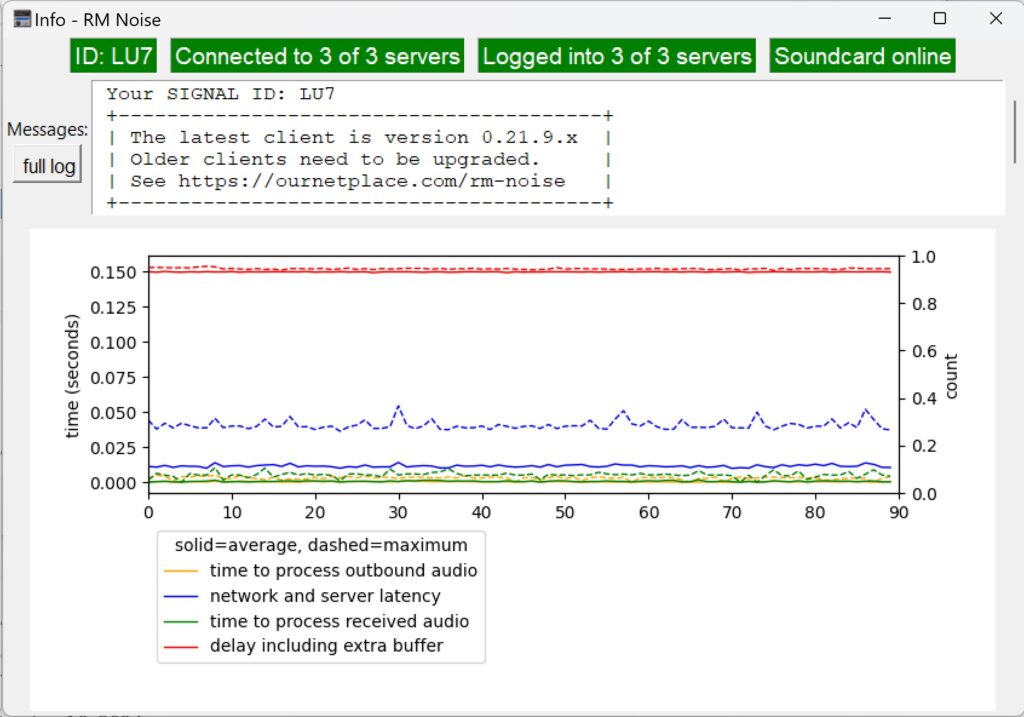
| Info Window Description |
|---|
| ID The ID is used to Listen to other signal by ID in options Messages This box shows messages from both the server and the client Full Log This button toggles the Full Log window Info Graph This graph displays latency metrics including network and server latency and the overall delay. Warning counters are also displayed. The following is a list of the error counters. |
| Warning Counter | Description |
|---|---|
| corrupt udp packet | A corrupted UDP packet was received |
| audio input level too high | The input level was too high – turn down the input level or volume of the radio |
| audio output level too high | The volume was set too high – turn down the volume on the main window |
| audio buffer exceeded count | The network packet arrived beyond the average latency plus the configured max audio buffer time and was dropped – consider raising max audio buffer under options |
| lost packet count | The network packet was lost |
| out of order packet count | Network packets arrived out of order and the order was corrected |
| Command Line Flag | Description |
|---|---|
--disable_graph | This option will disable the main graph to reduce processing requirements |
--max_buffer <time-in-ms> | Set the max audio buffer. In very high latency environments, this option can be used to raise the max audio buffer beyond the limits in the options slider. |
--frame_buffers <number-of-buffers> | Set the frame buffers which default to 150. In very high latency environments, this option can be increased to avoid audio dropouts. |
--username <username> | Set the username. Saved on successful login |
--password <password> | Set the password. Saved on successful login |
--filter_num <AI-filter-number> | Set the AI filter number. Saved |
--recording_name <recording-description> | Set the name for a recording. When used with recording minutes, RM Noise will immediately start a recording when launched. |
--recording_minutes <number-of-minutes> | Set the length of the recording, used with recording_name |
| Command Line Examples |
|---|
| This example launches RM Noise with the specified username: This example launches RM noise and makes a recording: rmnoise.exe --username k5qermnoise.exe --recording_name 6m-yagi-east-rain --recording_minutes 35 |
| Troubleshooting Audio |
|---|
| Configuración de hardware de audioLa salida de audio de la radio debe estar conectada a la entrada de línea de audio del ordenador, y tus auriculares/altavoz deben estar conectados a la salida de auriculares/altavoz del ordenador. Problema: Sin sonido o entrada de audio incorrecta Elige el dispositivo de entrada y el dispositivo de salida correctos en las opciones. No es necesario reiniciar a menos que uses la opción de hacer cambios en el mapeador de sonido de Microsoft mientras RM Noise está en marcha. Microsoft Sound Mapper Alternativamente, puedes dejar que Windows gestione los dispositivos de entrada y/o salida. Elige el dispositivo de entrada y/o salida correcto en Windows, y luego selecciona Microsoft Sound Mapper en RM Noise. Reinicia RM Noise tras cualquier cambio. Instrucciones para Windows 10: Navega a configuración -> sistema -> sonido -> entrada -> elige tu dispositivo de entrada y luego el dispositivo conectado a la radio. El dispositivo de salida se gestiona de forma similar. Instrucciones para Windows 11: Navega a configuración -> sistema -> sonido -> entrada -> elige un dispositivo para hablar o grabar, y luego elige el dispositivo conectado a la radio. El dispositivo de salida se gestiona de forma similar. Problema: La radio se escucha antes de iniciar el ruido RM La radio NO debe escucharse a través de los auriculares o altavoces antes de que se haya iniciado el ruido RM. Si oyes la radio antes de que se inicie RM Noise, probablemente sea por alguna configuración en Windows o el software de la tarjeta de sonido. Para comprobar la configuración de Windows: Instrucciones para Windows 11: Navega a configuración -> sistema -> sonido -> entrada -> (elige el dispositivo de entrada conectado a tu radio) -> avanzado (en mejorar audio) -pestaña > escuchar Asegúrate de que escuchar este dispositivo no esté marcado Instrucciones para Windows 10: Navega a configuración -> sistema -> sonido -> propiedades del dispositivo de entrada (no propiedades del dispositivo de sonido) -> propiedades adicionales del dispositivo -pestaña > escuchar Asegúrate de que escuchar este dispositivo no esté marcado |
© RM Ruido 2026. Construido usando WordPress y el tema Mesme